
How To Change The Battery In An Infiniti Key Fob: Easy Steps
Last Updated on October 14, 2026
You can replace your key fob battery in about five minutes using a flat-head screwdriver and a new CR2032 lithium coin battery. How to change the battery in an Infiniti key fob involves popping the plastic casing open, swapping the old cell for a fresh one, and snapping the cover back into place. This process is straightforward for most owners, though it varies by model — check your owner’s manual for the specific battery type required for your year and trim.
Items needed to change your Infiniti battery
CR2032 battery: This is the standard size for almost all modern Infiniti proximity keys. Always check the expiration date on the package; a battery sitting on a shelf for more than three years may lack the necessary amperage to signal the car’s ignition.
Flat-head screwdriver: A small precision tool works best to avoid scratching the plastic. If you lack a precision set, use a butter knife wrapped in tape, but be careful not to apply too much leverage, as the plastic tabs snap easily.
Soft cloth: Use this to wrap the screwdriver tip to protect the fob’s finish. This prevents unsightly gouges that lower the resale value of your key.
Clean workspace: A flat table helps you keep track of the tiny internal components. Place a white towel down first. This creates a high-contrast background that prevents the microscopic internal spring from vanishing if it pops out during disassembly.
Replacing the internal power cell
Remove the mechanical metal key from the fob by sliding the release tab on the back or side of the unit.
Insert your flat-head screwdriver into the small notch where the metal key was housed. Use a precision-sized driver; a standard household tool often cracks the plastic housing.
Twist the screwdriver gently to pry the two halves of the plastic key fob casing apart. If the casing resists, stop immediately. Applying force here usually snaps the internal locking tabs, which renders the fob unable to snap shut again.
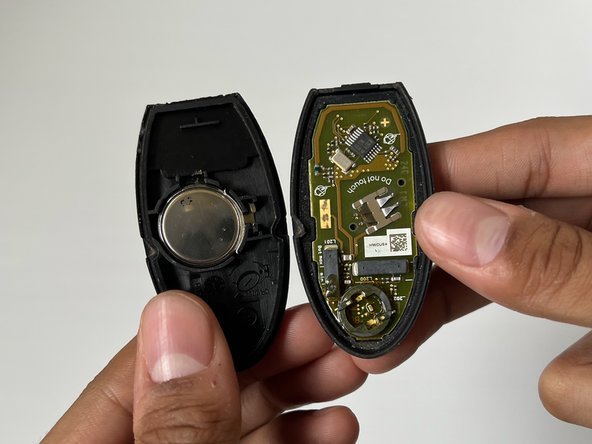
Lift the circuit board or the rubber insert carefully to reveal the coin-shaped battery underneath.
Slide the old battery out of its clip, noting which side faces up for the replacement. Most models require the positive (+) side to face the back cover, but check for a small “+” symbol embossed on the plastic clip itself.
Insert the new CR2032 battery with the positive (+) side facing the same direction as the original. If you install it upside down, the fob won’t transmit a signal, but you won’t damage the board.
Align the two halves of the fob and press them together until you hear a clear click. Ensure the rubber seal is seated correctly; a pinched gasket allows moisture to ruin the board within weeks.
Slide the mechanical key back into its slot to complete the assembly.
Tip: If the casing feels stuck, ensure you’re prying from the intended notch. Careful: Never touch the circuit board with metal tools, as a static discharge can fry the transmitter. Stop if you see exposed wires.
Battery performance by usage conditions
| Usage Situation | Expected Battery Life | Impact on Effort | Watch For |
|---|---|---|---|
| Daily heavy use | 12–18 months | High frequency | Range drop |
| Occasional weekend use | 24–36 months | Low frequency | Signal lag |
| Extreme cold weather | 6–10 months | High frequency | Intermittent lock |
If your battery drains in under six months, check for a stuck button or a short circuit caused by moisture ingress. These faults create a constant power draw that kills cells prematurely.
When installing replacements, start with a gentle touch. Add pressure only as needed to seat the housing. Using excessive force on the first try often snaps the delicate plastic tabs that secure the cover.
A broken tab forces the casing to sit slightly loose. This gap allows dust to enter and prevents the internal contacts from maintaining steady pressure. If the casing feels loose after a change, use a thin strip of electrical tape to maintain the seal. This prevents the intermittent connectivity that leads to total system failure.
Confirming a successful repair
A successful replacement means the fob indicator light blinks when you press any button and the vehicle responds immediately to lock or unlock commands. If the buttons feel soft or don’t respond, the battery might be upside down or the contact points may be dirty.
This method is prone to “battery flipping,” where the cell is installed with the wrong polarity, preventing the circuit from completing. Always double-check that the (+) side matches the orientation of the battery clip before closing the housing.
If the light remains dark after a fresh install, use a pencil eraser to gently scrub the metal contact prongs. Oxidation often builds up on these points, creating enough resistance to block the current. If the fob still fails, you likely have a dead “new” battery. Have a technician test the battery to ensure it’s functional.
Standards and final steps
The Infiniti smart key system operates on low-frequency radio waves defined by the Federal Communications Commission regarding consumer electronic emissions.
After replacing the battery, test the fob within five feet of the driver’s door to ensure the signal registers correctly. If the vehicle fails to recognize the fob, press the lock button three times while standing directly against the door handle to force a handshake.
If the vehicle still doesn’t start, the fob may require resynchronization at a dealership. This usually happens if the internal rolling code counter has drifted too far from the car’s receiver.
Keep the old battery away from children, as ingestion of lithium coin cells poses a significant health risk. Dispose of it at a local electronics recycling center. Never throw these cells in standard trash, as they can spark and ignite in compactors.
Related guides