
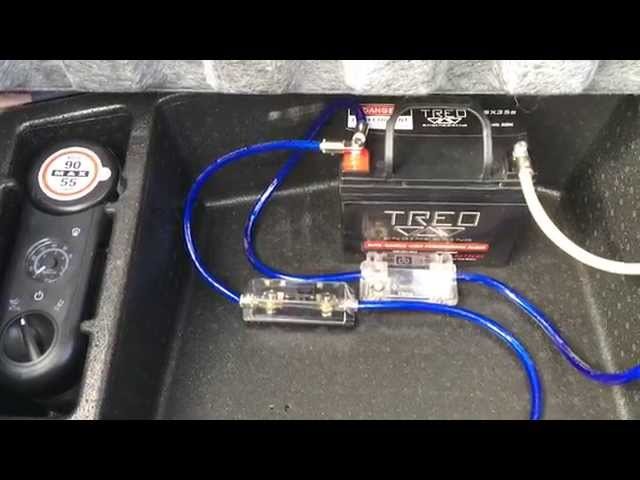
How To Wire Second Battery For Car Audio: Step-By-Step Guide
You connect a second battery in parallel to your main unit using a high-current isolator and heavy-gauge wiring to ensure your amplifier receives stable power. Wiring a second battery for car audio involves bridging the positive terminals together while ensuring both batteries share a common, robust ground path to the vehicle chassis. This guide explains the essential safety precautions, wiring steps, and maintenance required for a successful dual-battery installation in your vehicle.
Parts needed to wire a second battery
A secondary battery acts as a reserve energy reservoir for high-wattage sound systems that exceed the stock alternator’s output. It supports powerful subwoofers and amplifiers that would otherwise strain the electrical system. The system works by allowing the alternator to charge both units simultaneously while the isolator prevents the stereo from draining your main starting battery when the engine is off. This varies by model — check the label on your specific battery isolator to ensure it supports your alternator’s maximum amperage rating.
How To Wire Second Battery For Car Audio: Installation Steps
- Disconnect the negative terminal of your main car battery to prevent short circuits during the installation process.
- Mount the secondary battery in a secure, ventilated area, such as the trunk, using a heavy-duty battery hold-down bracket.
- Install a battery isolator between the positive terminal of the main battery and the positive terminal of the secondary battery.
- Run 0-gauge or 4-gauge oxygen-free copper power cable from the isolator output to the positive terminal of the secondary battery.
- Place an inline fuse within 12 inches of each battery positive terminal to protect the wiring from fire hazards.
- Connect the secondary battery’s negative terminal directly to the vehicle chassis using a short, thick ground cable.
- Reconnect the main battery and have a professional technician verify that both batteries are charging correctly with the engine running.
If you’re unsure about handling high-current electrical systems, seek professional installation; incorrect wiring can lead to vehicle fires or permanent damage to your alternator.
Essential System Metrics
If your amplifier draws more than 2,000 watts, you must upgrade your alternator alongside the battery.
| Total RMS Power | Wire Gauge | Fuse Rating | Watch For |
|---|---|---|---|
| Under 500W | 8-gauge | 50A | Cable heat |
| 500W – 1000W | 4-gauge | 100A | Voltage drop |
| 1000W – 2000W | 1/0-gauge | 200A | Alternator whine |
| Over 2000W | Dual 1/0-gauge | 300A+ | Dimming lights |
Quality Installation Standards
Successful installations rely on the integrity of your ground connections. Experienced installers always sand the paint off the chassis where the ground cable attaches to ensure a clean, metal-to-metal contact point. A weak ground limits current, causing flickering lights or distorted audio.
When running wires, keep the power cables away from your RCA signal cables to prevent electromagnetic interference. Finally, check all fuse connections after the first week of use, as vibrations can sometimes cause terminal screws to loosen. Tightening these connections prevents arching, which can damage equipment.
Troubleshooting Common Issues
| What you notice | What it usually means | What to do first |
|---|---|---|
| Dimming headlights | High current demand | Check alternator output |
| Buzzing in speakers | Ground loop interference | Re-route signal cables |
| Battery won’t charge | Isolator failure | Check remote turn-on wire |
| Burnt plastic smell | Loose connection | Tighten all terminals |
Legal And Safety Rules
Electrical modifications must comply with standard automotive practices to ensure safety. The National Highway Traffic Safety Administration provides guidance on vehicle equipment safety, emphasizing that any aftermarket component must be secured to prevent movement during a collision. You should never use household wiring, as it lacks the heat resistance required for the high-temperature environment under a car’s hood or trunk. If you lack proper crimping tools, have a professional shop finish the connections to ensure they handle vehicle vibration.
Long-term Maintenance
Once installed, check your battery connections every six months to ensure they remain tight and free of corrosion. If you notice white or blue powder on the terminals, clean them with a mixture of baking soda and water. If your vehicle sits for extended periods, use a trickle charger to prevent the batteries from losing their charge. Deep discharge cycles shorten battery lifespan, so keep them topped up for reliability.
When To Skip This Method
If you have a modern car with a complex “smart” alternator or a start-stop system, a simple isolator may confuse the vehicle’s computer. In these cases, you should use a dedicated DC-to-DC battery charger designed for automotive integration. Also, if you’re only running a small amplifier, a high-output alternator or a single high-performance AGM battery is often enough.
Frequently asked questions
Can I use different brands of batteries together?
No, you should use two identical batteries of the same chemistry, age, and capacity to prevent one from constantly draining the other or failing prematurely during the charging cycle.
How long will a second battery last with the engine off?
It lasts for one to three hours with typical listening volumes, but this depends entirely on your amplifier’s efficiency and the total amp-hour rating of your specific battery model.
Is it safe to mount a battery in the trunk?
Yes, it’s safe if you use a sealed AGM or lithium battery and secure it with a steel bracket, but never use a flooded lead-acid battery without a vented box.
How do I know if my alternator is strong enough?
You can confirm this by having a professional technician measure the voltage at the battery while the engine is running and all lights and the stereo are on to ensure the system is charging properly.
What happens if I don’t use an isolator?
If you skip the isolator, your stereo will drain both batteries when the engine is off, which will likely leave you stranded with a dead car battery.
Wire Second, in short
Once your setup is secure, take a short drive to test the system at different volume levels. Keep an eye on your headlights for any flickering while the music plays. If everything stays steady, you’re ready to enjoy your upgraded sound. Don’t forget to check your connections again after a few weeks.
Related guides